Drawing Mandelbrot Set with ARM Assembly and Linux Framebuffer
August 26, 2025

Intro
The Linux framebuffer may be old-school, but it’s still one of the cleanest ways to talk directly to the display. It bypasses the complexity of modern graphics stacks and gives you a simple memory region that represents the display. That makes it a perfect for experimenting with low-level rendering. For embedded Linux systems framebuffer can be especially interesting, allowing to write custom splash screens, native terminals and small demos.
It's probably a good idea to use at least C or higher level language when working with framebuffer. We're not going to do that.
Why be happy when you could be interesting?
-Slavoj Zizek
The goal of this article is to build a minimalist assembly program that writes pixels directly to the framebuffer. In Part 2 we will extend it with a faster vectorized implementation using ARM NEON. Rather than just drawing arbitrary pixels, we’ll render the Mandelbrot set. It's a far more interesting that way. As for the embedded target I'm going to be running it on the Linux display module from Reach Technology (I happen to work there) which runs on Linux built with Yocto. What's important is that it is based on NXP i.MX6DL which means we are going to be running a 32-bit kernel and writing using ARMv7-A assembly.
How to know your framebuffer
The Linux framebuffer provides a simple, hardware independent API for writing to the screen. The device is accessed through special device nodes, usually located in the /dev, i.e. /dev/fb0, /dev/fb1 etc. More information on framebuffer device can be found here.
Before doing anything with the framebuffer it's a good idea to learn more about its configuration. For our purposes the resolution and pixel format are of the most interest. We can do this by using the framebuffer API. What we need is to read contents of
struct fb_var_screeninfo and to do that we'll use FBIOGET_VSCREENINFO ioctl.
Here's a little C program that does just that:
#include <linux/fb.h>
#include <stdio.h>
#include <stdint.h>
#include <fcntl.h>
#include <unistd.h>
#include <stdlib.h>
#include <sys/ioctl.h>
#include <string.h>


int main(int argc, char* argv[])
{
    if (argc != 2)
    {
        fprintf(stderr, "Usage: %s /dev/fbX\n", argv[0]);
        exit(EXIT_FAILURE);
    }

    int32_t fbfd = open(argv[1], O_RDWR);

    if (fbfd < 0)
    {
        perror("open(fbdev)");
        exit(EXIT_FAILURE);
    }

    struct fb_var_screeninfo fbinfo;
    if (ioctl(fbfd, FBIOGET_VSCREENINFO, &fbinfo) < 0)
    {
        perror("ioctl(FBIOGET_VSCREENINFO)");
        close(fbfd);
        exit(EXIT_FAILURE);
    }

    printf("\n%s:\n\twidth: %d, height: %d, bpp: %d\n", argv[1], fbinfo.xres, fbinfo.yres, fbinfo.bits_per_pixel);
    printf("\tRGB: %d%d%d\n\n", fbinfo.red.length, fbinfo.green.length, fbinfo.blue.length);

    close(fbfd);
    return EXIT_SUCCESS;
}
Compiling and running the above we can see that our screen is a 1280x800 panel with 16bpp pixels. It uses popular in embedded world RGB565 pixel format:
irz@imx6dl:~# gcc fbinfo.c -O3 -o fbinfo
irz@imx6dl:~# ./fbinfo /dev/fb0
/dev/fb0:
        width: 1280, height: 800, bpp: 16
        RGB: 565
But even better option is to not write anything and use fbset command, if you have it on your embedded target
(chances are you do - it's even included in the BusyBox):
irz@imx6dl:~# fbset

mode "1280x800-0"
        # D: 0.000 MHz, H: 0.000 kHz, V: 0.000 Hz
        geometry 1280 800 1280 800 16
        timings 0 0 0 0 0 0 0
        accel true
        rgba 5/11,6/5,5/0,0/0
endmode
How to draw a pixel (Linux System Calls in ARM assembly)
Now when framebuffer parameters are known we can start working towards rendering something into it. First things first, since we're in Linux let's figure out how to do system calls from assembly. The Linux ARM syscall ABI looks something like this:
- Each syscall has a number assigned to it that needs to be placed in
r7. - Arguments are placed in
r0-r6. - After the above is done the
svc 0instruction is called.
svcis an ARM Supervisor Call instruction that causes a trap into privileged mode. In modern ARM EABI the number is ignored, so0is customary. It used to be thatswi <imm>was used which encoded syscall directly in the instruction, now it's mostly deprecated. - The kernel looks up that number in the syscall table and dispatches the corresponding function.
- Syscall return value is in
r0including negativeerrno.
ARM syscall table can be found at arch/arm/kernel/calls.S, but it's more convenient to consult with some external documentation.
There's an excellent 32-bit ARM EABI syscall table
inside Chromium documentation for example. They have tables for other architectures as well.
Now, let's look at some practical examples. Let's write a routine to open() the framebuffer:
open_fb:
    ldr r0, =fbdev
    mov r1, #2                  @ O_RDWR
    mov r7, #5                  @ open() syscall
    svc #0
    bx lr

.data
fbdev:  .asciz "/dev/fb0"
.end
The open() function definition is int open(const char *pathname, int flags).
Here we're placing pathname pointer into r0 (it's defined in the data segment as zero terminated ASCII string).
r1 contains the read/write flag (happens to be 2) and finally r7 contains the syscall number 5.
After all registers are in a good shape we call svc 0 to let kernel know we have some job for it.
Once this is done bx lr returns to the calling context.
Upon return from open_fb the r0 will contain the file descriptor (or error code if we're unlucky).
Let's write another syscall that we'll need. Here's exit(0) to indicate that our program is a success:
exit0:
    bl close_fb
    mov r0, #0
    mov r7, #1                  @ exit(0)
    svc #0
exit() has just one parameter: its status. Let's place 0 into r0 to indicate success.
And place 1 into r7 to call exit.
Now when we can open the framebuffer let's write something into it. To write data we can either mmap() fbdev memory into the process space or write directly via pwrite(). One thing about pwrite() is that it's a wrapper over pwrite64 syscall for unified access for all offset based calls. Regardless though, writing every pixel would introduce huge overhead.
The approach we're going to take is to define a buffer in memory to contain a whole frame and later flush rendered frame into a framebuffer via pwrite64().
Since we're writing whole frame at once this will be at least the same speed as mmap(), but will make timing deterministic so it's easier to benchmark against NEON implementation later.
First we set_pixel in the buffer for (x,y) pair:
/* -------------------------------------------------------------------
* set_pixel(x=r4, y=r5, color=r8)
* ------------------------------------------------------------------*/
set_pixel:
        push {r4-r6}
        ldr r0, =buf
        mov r6, WIDTH_PX
        mul r5, r5, r6
        add r5, r5, r4              @ index = y * WIDTH + x
        lsl r4, r5, #1              @ offset *= 2
        add r0, r0, r4
        strh r8, [r0]               @ store pixel color as half-word
        pop {r4-r6}
        bx lr
And then call pwrite64 to flush it:
/* -------------------------------------------------------------------
* Write final buffer to framebuffer with pwrite64(fd, buf, count, pos)
* ------------------------------------------------------------------*/
write_buf:
        mov r0, r6                  @ r0 = fb fd
        ldr r1, =buf                @ r1 = buffer addr
        mov r2, WIDTH_PX * HEIGHT_PX * 2   @ size in bytes
        mov r4, #0                  @ low 32 bits of pos
        mov r5, #0                  @ high 32 bits of pos
        mov r7, #0xB5               @ pwrite64() syscall
        svc #0
        b exit0
One interesting thing, there's a 64 in the name and it has important implication for assembly programmer.
Even on 32-bit kernels pwrite64() takes a 64-bit offset parameter of type loff_t to support files over 2GB.
That makes argument placement a bit tricky. r0 r1 r2 are loaded with parameters as expected. But then r3 is missing.
This can be explained by Procedure Call Standard for Arm Architecture.
In 32-bit ARM ABI 64-bit arguments must be loaded in a register pair starting from an even register, so we skip r3 and place pos into r4/r5 pair.
With the technicalities taken care of, we're ready to draw something fun on the screen.
Rendering Mandelbrot set
The Mandelbrot set has been a mainstay of computer graphics since the 1980s, when Benoît Mandelbrot first popularized it. It's an amazing example of how intricate complexity can emerge from simple mathematical rules. Over the decades, it has served as both a benchmark for performance and a proving ground for new rendering techniques. It only makes sense for us to continue this tradition.
This article is Part 1 of the series on using the framebuffer from ARM assembly. Here we take a straightforward scalar approach to compute the set iterating over (x,y) coordinates and calculating "escape time" for every pixel (e.g. Wikipedia). In Part 2 we will go over a vectorized approach using ARM NEON. Some other ways to improve on that would be using multithreading, boundary filling or exploiting the fact that the set is symmetrical across the real line, but that's beyond the scope of this article.
Let's see how we can render it, but first let's start with C implementation to understand what we need to do:
int32_t mandelbrot_fract(const uint32_t width, const uint32_t height) {
    // Define which region of a complex plane we are going to render
    const double x_min = -2.0;
    const double x_max = 1.0;
    const double y_min = -1.0;
    const double y_max = 1.0;

    // This will be used later to map iterations into pixel color
    // The number is tuned to get green hue
    const uint32_t color_shift = 5;

    // Tune this number to achieve desired speed vs. precision
    const uint32_t max_iterations = 200;

    // Remember that our color space is RGB565
    uint16_t clr = 0;

    for (uint32_t y = 0; y < height; y++) {
        for (uint32_t x = 0; x < width; x++) {
            // Scale complex plane to the size of our screen
            double c_real = x_min + (x * (x_max - x_min) / width);
            double c_imag = y_min + (y * (y_max - y_min) / height);

            // By definition z is a complex valued and starts at 0
            double z_real = 0;
            double z_imag = 0;
            uint32_t iterations = 0;

            // If ||z|| > 2 the point is out of the set, but stop after max iterations
            while (z_real * z_real + z_imag * z_imag < 4 && iterations < max_iterations) {
                // It can be shown that below is the computations to achieve
                // Re(z^2 + c) and Im(z^2 + c)
                double temp_real = z_real * z_real - z_imag * z_imag + c_real;
                double temp_imag = 2 * z_real * z_imag + c_imag;
                // Update the z, iterate
                z_real = temp_real;
                z_imag = temp_imag;
                iterations++;
            }

            // The following trick maps iterations into 16bit color space
            // At max iterations the color will be black to achieve canonical look
            clr = iterations << color_shift * (1 + iterations / (max_iterations / 4));
            // Implemented elsewhere
            set_pixel(x, y, clr);
        }
    }

    return 0;
}
The main idea of the algorithm is that for every pixel of the frame we compute the number of iterations it takes for point to "escape" the set or after
set number of iterations we concede that the point is bounded. The number of iterations is then mapped directly into pixel color by simple multiplication.
The coefficients are tuned such that the color is shifted toward green. The color_shift value can be changed to achieve interesting results.
Before jumping into assembly, let's spend some time on ARM floating point architecture and implementation. ARM processors include a Floating Point Unit (FPU) that handles single- and double-precision arithmetic much faster than doing it in software. On ARMv7-A and newer, the FPU is often paired with NEON, which extends it with SIMD (vector) capabilities which we are going to look at in Part 2.
ARM FPU contains independent floating point register file. The register file includes 32 registers named S0...S31 (see Figure 1):
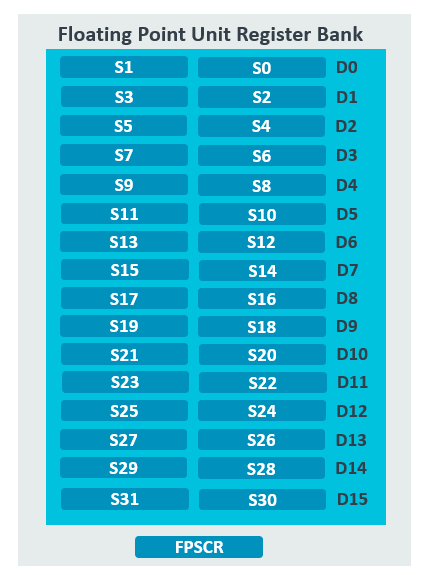
Figure 1. ARM Floating Point register file (from arm.developer.com)
Another register that will be important is FPSCR - Floating-Point Status and Control Register. FPSCR contains status bits that provide information about
floating-point operations and we'll use it for floating-point comparisons.
We’re going to take a few shortcuts to keep things simple, without taking away from the main idea. For starters, we’ll stick to single-precision floats instead of doubles. That will make code easier to follow and since we won't zoom into the set, extra precision won't do much. On top of that, some things like the framebuffer size, pixel format, and the region of the complex plane we render will be hardcoded. A fully general-purpose routine that adapts to arbitrary screen configurations is outside the scope of this demo.
Let’s start by looking at the full assembly source code up front. After that, we’ll pick out a few interesting details and talk through why they’re written the way they are:
/* -------------------------------------------------------------------
* Mandelbrot set renderer in ARM AArch32 assembly
* ------------------------------------------------------------------*/

.syntax unified
.text
.global _start

.equ    WIDTH_PX,   1280
.equ    HEIGHT_PX,   800
.equ    MAX_ITER,    200

/* Precomputed reciprocal scale factors */
wrecf:  .single 0.00078125          @ 1 / WIDTH_PX
hrecf:  .single 0.00125             @ 1 / HEIGHT_PX

/* -------------------------------------------------------------------
* This entry point will need to be passed into linker
* ------------------------------------------------------------------*/
_start:
        bl open_fb                  @ open("/dev/fb0", O_RDWR)
        cmp r0, #0
        bmi exit1                   @ If open() failed exit with 1
        mov r6, r0                  @ Save framebuffer file descriptor

        vmov.f32 s0, #-2.0          @ xmin
        vmov.f32 s1, #1.0           @ xmax
        vmov.f32 s2, #-1.0          @ ymin
        vmov.f32 s3, #1.0           @ ymax

        vsub.f32 s4, s1, s0
        vldr.f32 s5, wrecf
        vmul.f32 s4, s4, s5         @ xmul = (xmax - xmin) * (1/WIDTH)

        vsub.f32 s5, s3, s2
        vldr.f32 s6, hrecf
        vmul.f32 s5, s5, s6         @ ymul = (ymax - ymin) * (1/HEIGHT)

        vmov.f32 s3, #4.0
        vmov.f32 s20, #2.0

        mov r5, #0                  @ y = 0
        mov r9, #5                  @ Multiplier for color scaling
y_loop:
        cmp r5, HEIGHT_PX
        bge write_buf

        mov r4, #0                  @ x = 0
x_loop:
        cmp r4, WIDTH_PX
        bge x_end

        mov r7, #0                  @ it = 0
        vsub.f32 s6, s6, s6         @ zreal = 0
        vsub.f32 s7, s7, s7         @ zimag = 0

        /* Convert pixel (x,y) to floating-point values */
        vmov.f32 s8, r4
        vcvt.f32.u32 s8, s8
        vmov.f32 s9, r5
        vcvt.f32.u32 s9, s9

        /* Map pixel -> complex plane coordinate (creal + cimag*i) */
        vmul.f32 s8, s8, s4
        vadd.f32 s8, s8, s0         @ creal
        vmul.f32 s9, s9, s5
        vadd.f32 s9, s9, s2         @ cimag
loop:
        cmp r7, MAX_ITER
        beq loop_done

        vmul.f32 s10, s6, s6
        vmul.f32 s11, s7, s7
        vadd.f32 s1, s10, s11       @ |z|^2 = zr^2 + zi^2
        vcmp.f32 s1, s3
        vmrs APSR_nzcv, fpscr
        bpl loop_done               @ If |z|^2 >= 4, escape

        vsub.f32 s12, s10, s11
        vadd.f32 s12, s12, s8       @ new zreal
        vmul.f32 s13, s6, s7
        vmul.f32 s13, s13, s20
        vadd.f32 s7, s13, s9        @ new zimag

        vmov.f32 s6, s12            @ update zreal
        add r7, r7, #1              @ it++
        b loop
loop_done:
        lsr r8, r7, #6              @ Divide by 64 to simplify scaling
        add r8, r8, #1
        mul r8, r8, r9
        lsl r8, r7, r8              @ Generate pseudo-color
        bl set_pixel

        add r4, r4, #1              @ x++
        b x_loop
x_end:
        add r5, r5, #1              @ y++
        b y_loop

/* -------------------------------------------------------------------
* Write final frame to framebuffer with pwrite64()
* ------------------------------------------------------------------*/
write_buf:
        mov r0, r6                  @ r0 = fb fd
        ldr r1, =buf                @ r1 = buffer addr
        mov r2, WIDTH_PX * HEIGHT_PX * 2   @ size in bytes
        mov r3, #0
        mov r4, #0
        mov r5, #0
        mov r7, #0xB5               @ pwrite64() syscall
        svc #0
        b exit0

/* -------------------------------------------------------------------
* set_pixel(x=r4, y=r5, color=r8)
* ------------------------------------------------------------------*/
set_pixel:
        push {r4-r6}
        ldr r0, =buf
        mov r6, WIDTH_PX
        mul r5, r5, r6
        add r5, r5, r4              @ index = y * WIDTH + x
        lsl r4, r5, #1              @ offset *= 2
        add r0, r0, r4
        strh r8, [r0]               @ store pixel color as half-word
        pop {r4-r6}
        bx lr

open_fb:
        ldr r0, =fbdev
        mov r1, #2                  @ O_RDWR
        mov r7, #5                  @ open() syscall offset
        svc #0
        bx lr

close_fb:
        mov r0, r6
        mov r7, #6                  @ close() syscall
        svc #0
        bx lr

exit1:
        mov r0, #1
        mov r7, #1                  @ exit(1)
        svc #0

exit0:
        bl close_fb
        mov r0, #0
        mov r7, #1                  @ exit(0)
        svc #0

.data
buf:    .space WIDTH_PX * HEIGHT_PX * 2   @ Pixel buffer (RGB565)
fbdev:  .asciz "/dev/fb0"
.end
With the big picture in mind, let’s take a closer look at some of the instructions and see why they’re written that way.
On ARM, floating-point divisions are expensive compared to multiplies. One common trick is to precompute reciprocals and then use a multiply instead of a divide. Knowing framebuffer dimensions in advance allows to define the reciprocal values for 1/WIDTH and 1/HEIGHT:
/* Precomputed reciprocal scale factors for mapping pixels -> complex plane */
wrecf:  .single 0.00078125          @ 1 / WIDTH_PX
hrecf:  .single 0.00125             @ 1 / HEIGHT_PX
We can see that those are in the .text segment too. This is to make our life easier. Instructions like vldr can only reach so far: on ARMv7, the maximum offset is typically ±1020 bytes from the pc. By storing reciprocals directly in the text segment and being aware of the offset we can load them with a single vldr instruction, without extra indirection or setup code:
vsub.f32 s4, s1, s0
vldr.f32 s5, wrecf
vmul.f32 s4, s4, s5         @ xmul = (xmax - xmin) * (1/WIDTH)
Arguably, doing this is not very important performance-wise since these computations are outside of main loop, but still it's an interesting trick.
Another interesting quirk of ARM assembly is how floating-point values can be loaded into a register via immediate vmov. But unlike integer mov where
you can place arbitrary values (although mov can become a pseudo-instruction for arbitrary integer) vmov allows a very limited subset of floats. Those can be expressed as (±n) × 2−r, where n and r are integers, 16 ≤ n ≤ 31, 0 ≤ r ≤ 7. In practice it means that floating-point signed integers such as 1.0, 2.0 and 0.0 are available as well as fractions such as ±0.5, ±0.25 etc.:
vmov.f32 s0, #-2.0          @ xmin
vmov.f32 s1, #1.0           @ xmax
vmov.f32 s2, #-1.0          @ ymin
vmov.f32 s3, #1.0           @ ymax
Floating point comparisons (and conditional branching on floating-point values) looks a little different. FPU has its own status and control register, but
conditional branching can only be executed on APSR NZCV flags. Those flags need to be copied explicitly from FPSCR via the vmrs instruction:
vadd.f32 s1, s10, s11       @ |z|^2 = zr^2 + zi^2
vcmp.f32 s1, s3
vmrs APSR_nzcv, fpscr
bpl loop_done               @ If |z|^2 >= 4, escape
Remember how we computed pixel color in the C version: clr = iterations << color_shift * (1 + iterations / (max_iterations / 4))?
In assembly we'll change this part a bit. With max_iterations = 200 the right part is 50. We can simplify division here
by dividing by 64 via right shift (we can use lsr because we operate on unsigned integer). This produces virtually the same color. One reason we do that
is that i.MX6DL being a Cortex-A9 processor doesn't support hardware division (I know right...), so we can easily spend tens of cycles on software division.
loop_done:
    lsr r8, r7, #6              @ Divide by 64 to simplify scaling
    add r8, r8, #1
    mul r8, r8, r9
    lsl r8, r7, r8              @ Generate pseudo-color
    bl set_pixel
Interestingly, most compilers will generate very efficient code for integer division by a constant. Turns out you can always substitute division by an integer constant with multiplication by a reciprocal value followed by a shift. But, the value of this reciprocal has to be chosen with care. See here for explanation.
Last step. Let's build it and run:
irz@imx6dl:~# gcc -o mandelbrot -mfpu=auto -march=armv7-a+mp+sec+neon-fp16 -nostartfiles -Xlinker -e_start
irz@imx6dl:~# ./mandelbrot
Results
Finally here's the result - Mandelbrot set in all its glory:

Figure 2. Mandelbrot set rendered in ARM assembly (from device framebuffer)
We can see a little baby Mandelbrot toward the left. In fact, there's infinite number of them sitting on the real line within the set.
I grabbed this image directly from the device's framebuffer. With a read-only filesystem it's not easy to install stuff, so getting it converted took a two-step process. First save raw bytes of the image via dd, but be careful to only grab actual image bytes - 1280*800*2:
dd if=/dev/fb0 of=fb.raw bs=2048000 count=1 status=progress
Then scp it and use ffmpeg to convert to png. ImageMagick sounds like more obvious choice, but it doesn't support RGB565 out of the box, while ffmpeg does:
ffmpeg -f rawvideo -pixel_format rgb565 -video_size 1280x800 -i fb.raw mandelbrot.png
Conclusion
In this first part, we explored direct interaction with the Linux framebuffer, implemented system calls from ARM assembly, and used the ARM VFP floating-point unit to handle the Mandelbrot set computations. The end result was a working scalar Mandelbrot renderer, and the output looks fantastic... In Part 2, we’ll look at ARM NEON, the vector/SIMD extension, and see how we can improve upon our solution. Can NEON actually move the needle and make rendering noticeably faster? Source code can always be found at my GitHub.